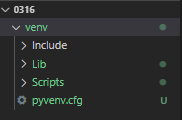
가상환경만들기
python -m venv venv
가상 환경 만들어주기
폴더를 하나 가집니다.

여기서 어떤 폴더를 가지고있는지 확인하기위한 명령어
which pip
을 처주면 경로가하나 나오는데 이는 파이썬이 설치된 경로를 보여줍니다.
즉, pip install 을 사용하면 저기에 다 설치가된다!
근데 위와같은 가상환경을 만들어주면? 바로 폴더에 설치가 된다는 것.
여기서 이 명령을 처보자
source venv/Scripts/activate
그후 다시 which pip 을 입력하면
이번에는 venv(가상환경)의 경로를 보여줍니다.
vi ~/.bash_profile 입력후 i 를 누르고 아래에 INSERT 가뜨면 입력해주자
alias activate="source venv/Scripts/activate"

저는 한글로 돼있어서 끼워넣기.. 라고 적혀있습니다 ㅋㅋ
esc 누르고"INSERT" 또는 "--끼워넣기--" 가 사라지면
:wq 를 입력하여 나가줍니다.

그리고 터미널을 껏다가 다시켜주세요.
이번에 명령어는 터미널(.bash_profile파일 자체)을 재가동 한다는 뜻입니다.
source ~/.bash_profile
소스 명령어를 치고 바로 아래 명령어를 처봅시다.
activate

이것을 하는 이유
개발자(자신)의 편의를 위함!
가상 환경 세팅
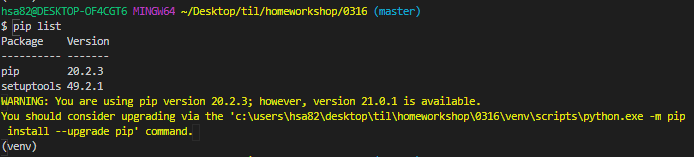
해당 폴더에 인스톨된 친구들을 확인하기위해 list 를 봐보자
pip list
그러면 기본적으로 깔리는 2가지밖에 없을 것이다.

여기다가 장고를 설치해주자
pip install django
그후 pip list 를 다시 입력!

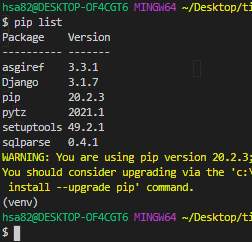
장고가 해당 폴더에 설치된 것을 볼수가있다!
프로젝트 만들기
django-admin startproject config .
python manage.py startapp articles
앱 등록하기
setting.py 에서 INSTALL APP 수정!
models.py로
from django.db import models

# Create your models here.
class Article(models.Model):
    title = models.CharField(max_length = 100)
    content = models.TextField()
    created_at = models.DateTimeField(auto_now_add=True)
    updated_at = models.DateTimeField(auto_now=True)

    def __str__(self):
        return f'{self.title}: {self.content}'
후에 마이그레이트 // def 꼭 class 안에 ㅠㅠ
python manage.py makemigrations && python manage.py migrate
&&은 척보면.. 척.. 뒤에 자동으로 입력해주기!
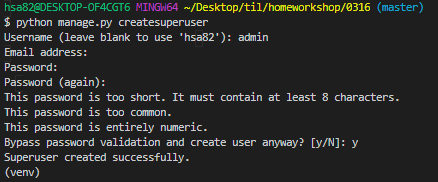
그리고 슈퍼 유저 만들어주기
python manage.py createsuperuser

python manage.py runserver
후에 http://127.0.0.1:8000/admin/으로 들어가보자
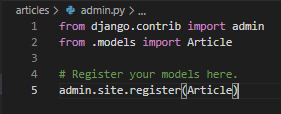
로그인하고 서버 끄지 않은상태로 admin.py 로가보자!
admin.py
from django.contrib import admin
from .models import Article

# Register your models here.
admin.site.register(Article)

이렇게 입력후에 다시 admin 사이트를 가보면

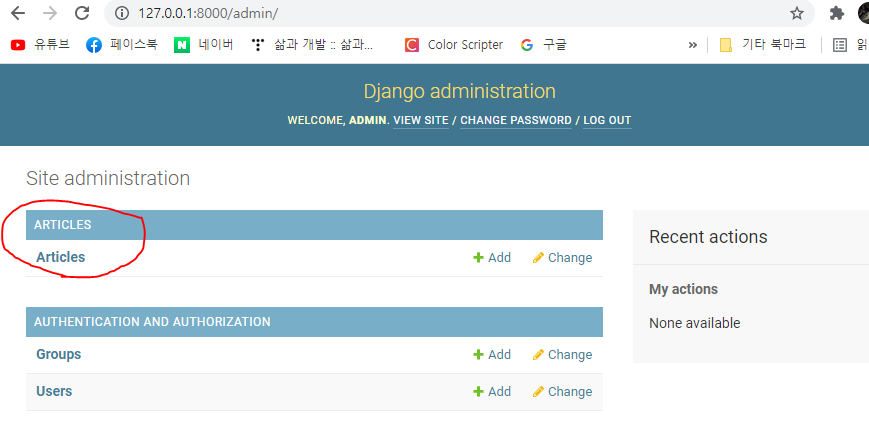
Articles 가 등록돼있습니다. 후에 Articles 옆 Add 를 클릭하여 글을 입력해보자(데이터 생성)

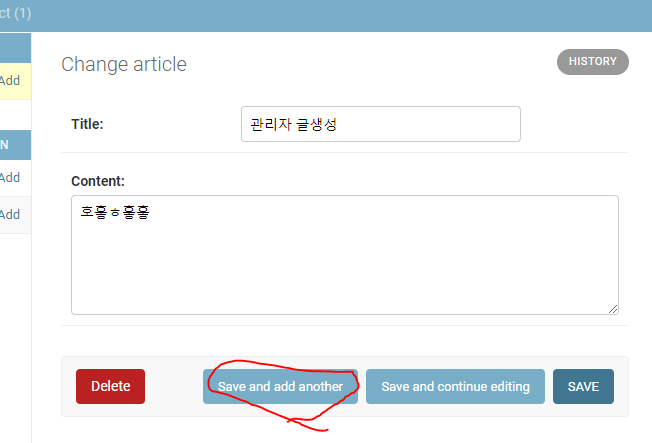
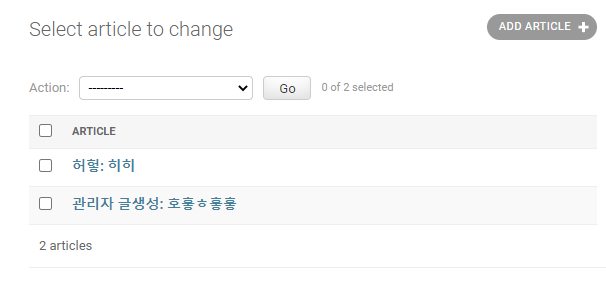
저렇게 save 해주고 나가보면 아래와 같이 제가 생성한 데이터를 볼수있습니다.

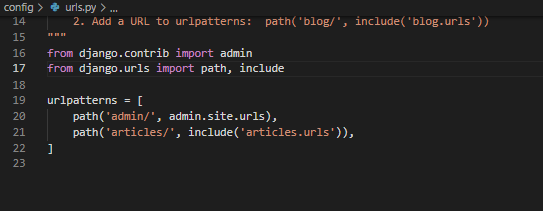
url 만들고 넘어가는 거
config > ulrs.py
from django.contrib import admin
from django.urls import path, include

urlpatterns = [
    path('admin/', admin.site.urls),
    path('articles/', include('articles.urls')),
]

index 등록
articles 에서 urls.py 만들기(새 파일)
from django.urls import path
from . import views

app_name ='articles'
urlpatterns = [
    # READ
    path('',views.index, name='index'),
    # CREATE
    # DELETE
    # UPDATE
]
articles 에서 views.py
from django.shortcuts import render
from .models import Article

# Create your views here.
def index(request):
    # 1. DB에서 게시글 전부 가져옵니다.
    # 2. context에 담아서 index.html로 넘겨 줍니다.
    return render(reqeust,'articles/index.html')
index.html
index.html 만들기 (templates/articles)
views.py 수정
from django.shortcuts import render
from .models import Article

# Create your views here.
def index(request):
    # 1. DB에서 게시글 전부 가져옵니다.
    # article_list = Article = article.objects.all()[::-1] # 첫번째 방법
    # 두번쨰 방법( 성능이 좀더 빠르다. )
    article_list = Article = article.objects.order_by('-updated_at')

    # 2. context에 담아서 index.html로 넘겨 줍니다.
    context = {
        'article_list':article_list,
    }
    return render(reqeust,'articles/index.html', context)
article_list = Article = article.objects.order_by('-updated_at')와
article_list = Article = article.objects.all().order_by('-updated_at')의 차이는?
index.html 글쓰기 만들기
<h1>게시글 목록</h1>

<a href="{% url 'articles:new' %}">글쓰기</a>

{% for article in article_list %}
    <h2>{{ article.title }}</h2>
    <p>{{ article.content }}</p>
{% endfor %}
urls.py
from django.urls import path
from . import views

app_name ='articles'
urlpatterns = [
    # READ
    path('',views.index, name='index'),
    # CREATE
    path('new/', views.new, name='new'),
    # DELETE
    # UPDATE
]
views.py
from django.shortcuts import render
from .models import Article

# Create your views here.
def index(request):
    # 1. DB에서 게시글 전부 가져옵니다.
    # Article = article.objects.all()[::-1] # 첫번째 방법
    # 두번쨰 방법( 성능이 좀더 빠르다. )
    article_list = Article.objects.order_by('updated_at')

    # 2. context에 담아서 index.html로 넘겨 줍니다.
    context = {
        'article_list':article_list,
    }
    return render(request,'articles/index.html', context)

def new(reqeust):
	return render(request, 'articles/new.html')
new.html
<form action="{% url 'articles:create' %}" method="POST">
    <input type="text" name ='title'>
    <br>
    <input type="text" name='content'>
    <br>
    <input type="submit">
</form>
post 를쓰는이유
url에 글자제한도 있고, 서버를 수정하는거이기 때문입니다
DB 데이터에 변동이 생기면 post
urls 로가서 create 만들어주기
from django.urls import path
from . import views

app_name ='articles'
urlpatterns = [
    # READ
    path('',views.index, name='index'),
    # CREATE
    path('new/', views.new, name='new'),
    path('create/', views.new, name='create'),
    # DELETE
    # UPDATE
]
views.py 에서 def create 만들기
from django.shortcuts import render, redirect
from .models import Article

# Create your views here.
def index(request):
    # 1. DB에서 게시글 전부 가져옵니다.
    # Article = article.objects.all()[::-1] # 첫번째 방법
    # 두번쨰 방법( 성능이 좀더 빠르다. )
    article_list = Article.objects.order_by('updated_at')

    # 2. context에 담아서 index.html로 넘겨 줍니다.
    context = {
        'article_list':article_list,
    }
    return render(request,'articles/index.html', context)


def new(request):
	return render(request, 'articles/new.html')


def create(request):
    # 1. Form 에서 넘어온 데이터를 꺼냅니다.
    title = request.POST.get('title')
    content = request.POST.get('content')

    # 2. DB에 저장
    # Article(title=title,content=content)
    article = Article.objects.create(title=title,content=content)
    return redirect('articles:index')
new와 create 합쳐주기
from django.shortcuts import render, redirect
from .models import Article

# Create your views here.
def index(request):
    # 1. DB에서 게시글 전부 가져옵니다.
    # Article = article.objects.all()[::-1] # 첫번째 방법
    # 두번쨰 방법( 성능이 좀더 빠르다. )
    article_list = Article.objects.order_by('updated_at')

    # 2. context에 담아서 index.html로 넘겨 줍니다.
    context = {
        'article_list':article_list,
    }
    return render(request,'articles/index.html', context)


def new(request):
    if request.method =='POST':
        # 1. Form 에서 넘어온 데이터를 꺼냅니다.
        title = request.POST.get('title')
        content = request.POST.get('content')

        # 2. DB에 저장
        # Article(title=title,content=content)
        article = Article.objects.create(title=title,content=content)
        return redirect('articles:index') #at name: 인덱스
    else:
        return render(request,'articles/new.html')


# 1. NOT NULL contsraints
# => 데이터베이스에 빈 값이 들어가려고한다.
# =>
그럼 views 로가서 create 지우기
from django.urls import path
from . import views

app_name ='articles'
urlpatterns = [
    # READ
    path('',views.index, name='index'),
    # CREATE
    path('new/', views.new, name='new'),

    # DELETE
    # UPDATE
]
new.html에서 url 바꾸기
<form action="" method="POST">
    {% csrf_token %}
    <input type="text" name='title'>
    <br>
    <input type="text" name='content'>
    <br>
    <input type="submit">
</form>
액션에 아무것도 안적으면 현재 페이지로 다시 요청을 보냅니다.
이것의 장점은 하나의 함수로 사용가능
속도차이는 없음
여기까지 바꾼것
사용자와 장고는
GET방식으로 new 요청을보냅니다
new.html 사용자에게 다시 보냅니다.
POST방식으로 new 요청 보냅니다
index.html로 사용자에게 다시보냅니다.
수정하기 만들기
index.html 수정하기 버튼 만들기
<h1>게시글 목록</h1>

<a href="{% url 'articles:new' %}">글쓰기</a>

{% for article in article_list %}
    <h2>{{ article.title }}</h2>
    <p>{{ article.content }}</p>

    <a href="{% url 'articles:update' article.pk %}">수정하기</a>

{% endfor %}
urls.py 에서 update 만들기
from django.urls import path
from . import views

app_name ='articles'
urlpatterns = [
    # READ
    path('',views.index, name='index'),
    # CREATE
    path('new/', views.new, name='new'),

    # DELETE
    # UPDATE
    path('<int:article_pk>/update/', views.update, name='update')
]
이는 /articles/3/update/ >>> 게시글목록 /3 / 수정
views.py 만들기
from django.shortcuts import render, redirect
from .models import Article

# Create your views here.
def index(request):
    # 1. DB에서 게시글 전부 가져옵니다.
    # Article = article.objects.all()[::-1] # 첫번째 방법
    # 두번쨰 방법( 성능이 좀더 빠르다. )
    article_list = Article.objects.order_by('updated_at')

    # 2. context에 담아서 index.html로 넘겨 줍니다.
    context = {
        'article_list':article_list,
    }
    return render(request,'articles/index.html', context)


def new(request):
    if request.method =='POST':
        # 1. Form 에서 넘어온 데이터를 꺼냅니다.
        title = request.POST.get('title')
        content = request.POST.get('content')

        # 2. DB에 저장
        # Article(title=title,content=content)
        article = Article.objects.create(title=title,content=content)
        return redirect('articles:index') #at name: 인덱스
    else:
        return render(request,'articles/new.html')
# 1. NOT NULL contsraints
# => 데이터베이스에 빈 값이 들어가려고한다.
# =>


def update(request, article_pk):
    if request.method == 'POST':
        pass
    else:
        # 기존의 내용을 가져와서 넘겨준다.
        article = Article.objects.get(pk=article_pk)
        context = {
            'article':article,
        }
        return render(request, 'update.html',context)
update.html 만들기
<form action="" method="POST">
    {% csrf_token %}
    <input type="text" name='title' value = "{{ article.title }}">
    <br>
    <input type="text" name='content' value = "{{ article.content }}">
    <br>
    <input type="submit">
</form>
views.py에서 def update 수정하기
from django.shortcuts import render, redirect
from .models import Article

# Create your views here.
def index(request):
    # 1. DB에서 게시글 전부 가져옵니다.
    # Article = article.objects.all()[::-1] # 첫번째 방법
    # 두번쨰 방법( 성능이 좀더 빠르다. )
    article_list = Article.objects.order_by('updated_at')

    # 2. context에 담아서 index.html로 넘겨 줍니다.
    context = {
        'article_list':article_list,
    }
    return render(request,'articles/index.html', context)


def new(request):
    if request.method =='POST':
        # 1. Form 에서 넘어온 데이터를 꺼냅니다.
        title = request.POST.get('title')
        content = request.POST.get('content')

        # 2. DB에 저장
        # Article(title=title,content=content)
        article = Article.objects.create(title=title,content=content)
        return redirect('articles:index') #at name: 인덱스
    else:
        return render(request,'articles/new.html')
# 1. NOT NULL contsraints
# => 데이터베이스에 빈 값이 들어가려고한다.
# =>


def update(request, article_pk):
    article = Article.objects.get(pk=article_pk)
    if request.method == 'POST':
        #새로 작성된 게시글 정보를 꺼냅니다.
        title = request.POST.get('title')
        content = request.POST.get('content')
        #기존 게시글의 내용에 덮어씌웁니다.
        article.title = title
        article.content = content
        article.save()
        return redirect('articles:index')
        pass
    else:
        # 기존의 내용을 가져와서 넘겨준다.
        context = {
            'article':article,
        }
        return render(request, 'articles/update.html', context)
update.html 부분 수정하기
<form action="{% url 'articles:update' article.pk %}" method="POST">
    {% csrf_token %}
    <input type="text" name='title' value = "{{ article.title }}">
    <br>
    <input type="text" name='content' value = "{{ article.content }}">
    <br>
    <input type="submit">
</form>
- 수정을 안해도 작동은 합니다만, 일단 적으세용!
- 나중에 꼬이려나?
유효성검사
def update(request, article_pk):
    article = Article.objects.get(pk=article_pk)
    if request.method == 'POST':
        #새로 작성된 게시글 정보를 꺼냅니다.
        title = request.POST.get('title')
        content = request.POST.get('content')
        # 유효성 검사하기
        # if title.length <= 10:
        #     ... 하지만 장고 자체 기능을 사용해보자

        #기존 게시글의 내용에 덮어씌웁니다.
        article.title = title
        article.content = content
        article.save()
        return redirect('articles:index')
        pass
    else:
        # 기존의 내용을 가져와서 넘겨준다.
        context = {
            'article':article,
        }
        return render(request, 'articles/update.html', context)
원래라면 저렇게 유효성 검사를 실시해야한다 하지만
장고 자체 기능이 있다. 먼저 articles 에 forms.py 를 만들어주자


forms.py
# django의 form은 크게 세 부분을 처리해줍니다.
# 1. fpsejflddmf dnlgks epdlxj wnsql
# 2. 데이터에 대한 HTML form 태그 생성
# 3. 클라이언트(사용자)로부터 받은 데이터 수신 및 처리

from django import forms

class ArticleForm(forms.Form):
    title = forms.CharField(max_length=100)
    content = forms.CharField()
저장후 views.py 로이동
views.py
에서 .forms 아티크 폼즈 임포트
new 수정
def new(request):
    form = ArticleForm() #여기 수정
    if request.method =='POST':
        # 1. Form 에서 넘어온 데이터를 꺼냅니다.
        title = request.POST.get('title')
        content = request.POST.get('content')

        # 2. DB에 저장
        # Article(title=title,content=content)
        article = Article.objects.create(title=title,content=content)
        return redirect('articles:index') #at name: 인덱스
    else:
        context = { # 컨텍스트 추가
            'form':form,
        }
        return render(request,'articles/new.html', context)
맨위 form 과 context를 추가해준다.
리턴할떄 컨테슥트 추가 꼭..
new.html 로가보자
<form action="" method="POST">
    {% csrf_token %}
    <input type="text" name='title'>
    <br>
    <input type="text" name='content'>
    <br>
    <input type="submit">
</form>
input 부분을 지우고
<form action="" method="POST">
    {% csrf_token %}
    {{ form }}
    <input type="submit">
</form>
로 바꿔준다
만약 다른 방식으로 보고싶다면
<form action="" method="POST">
    {% csrf_token %}
    {{ form.as_p }}
    <input type="submit">
</form>
textarea 로 바꿔보자
forms.py 로이동
# django의 form은 크게 세 부분을 처리해줍니다.
# 1. fpsejflddmf dnlgks epdlxj wnsql
# 2. 데이터에 대한 HTML form 태그 생성
# 3. 클라이언트(사용자)로부터 받은 데이터 수신 및 처리

from django import forms

class ArticleForm(forms.Form):
    title = forms.CharField(max_length=100)
    content = forms.CharField()
여기서 아래로 교체
# django의 form은 크게 세 부분을 처리해줍니다.
# 1. fpsejflddmf dnlgks epdlxj wnsql
# 2. 데이터에 대한 HTML form 태그 생성
# 3. 클라이언트(사용자)로부터 받은 데이터 수신 및 처리

from django import forms

class ArticleForm(forms.Form):
    title = forms.CharField(max_length=100)
    content = forms.CharField(widget=forms.Textarea)
폼과 관련된 내용은
https://docs.djangoproject.com/en/3.1/ref/forms/api/#ref-forms-api-outputting-html
에서 확인이 가능합니다!
여기까지 CRUD와 forms 에 대하여 배웠습니다.
class 에서 def new form 으로 넘긴다. 그것을 바로 아래 else 의 context = form 으로 옮긴다.
장고 폼을 이용한 유효성 검사
views.py에서 new 부분
def new(request):
    form = ArticleForm()
    if request.method =='POST':
        # 1. Form 에서 넘어온 데이터를 꺼냅니다.
        title = request.POST.get('title')
        content = request.POST.get('content')

        # 2. DB에 저장
        # Article(title=title,content=content)
        article = Article.objects.create(title=title,content=content)
        return redirect('articles:index') #at name: 인덱스
    else:
        context = {
            'form':form,
        }
        return render(request,'articles/new.html', context)
에서 if 문 내부를 지워주고 아래와 같이 바꿉니다.
def new(request):
    form = ArticleForm()
    if request.method =='POST':
        form = ArticleForm(request.POST)
        if form.is_valid(): # 유효성 검사
            title = form.cleaned_data.get('title')        #reqeust.POST 까지가 dict 부분
            content = form.cleaned_data.get('content')
            Article.objects.create(title=title, content=content)
            return redirect('articles:index') #at name: 인덱스
    else:
        context = {
            'form':form,
        }
        return render(request,'articles/new.html', context)
개발자도구가기


클릭 후에 title을 선택하고 글자 길이를 지워줍니다.

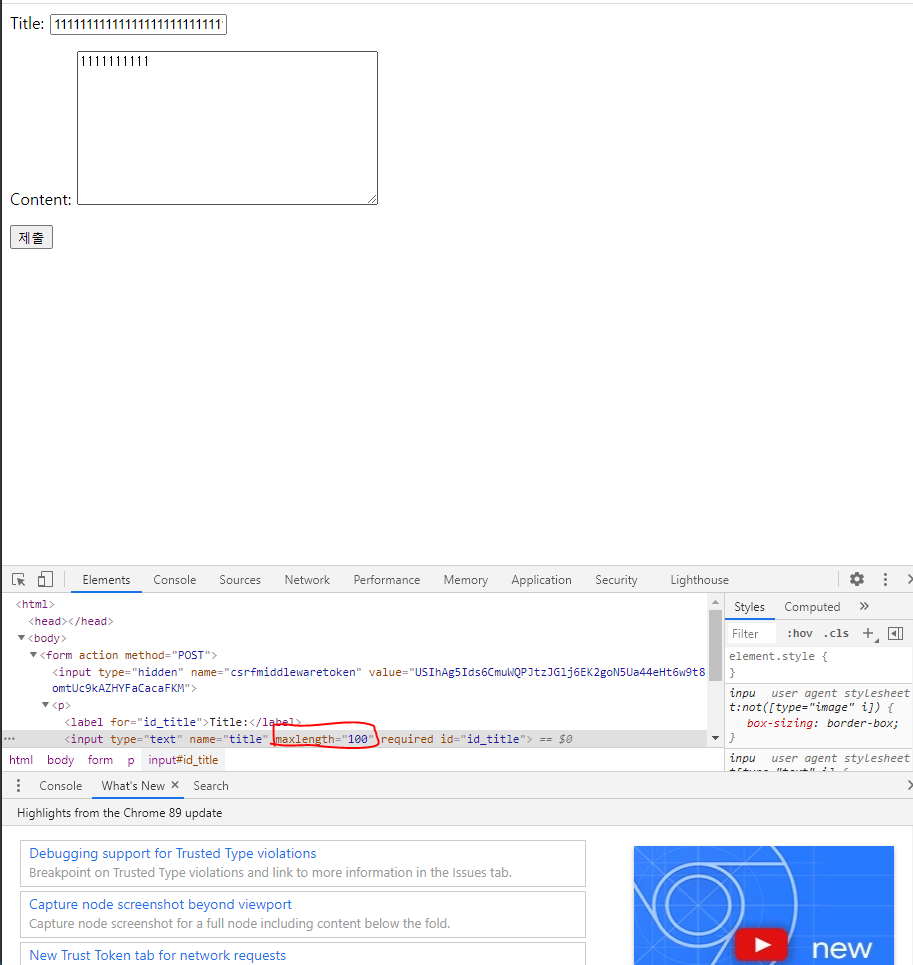
지우고 100자이상의 제목을 적어서 제출하면


이라는 오류가 뜹니다
views 라는 함수가 reutrn 이 없었다는 뜻의 오류입니다.
위와 같이 하는 이유는 아래 최종수정을 할시에 100자이상입력이 안되는 것을 크롬에서 뚫기위해 하였던 것!
최종 수정
def new(request):
    if request.method =='POST':
        # 폼 인스턴스를 생성하고 요청에 의한 데이터로 채웁니다 (binding).
        form = ArticleForm(request.POST)
        # 폼에 바인딩된 데이터가 유효한지 검사합니다.
        # is_vaild() 메서드는 True/False를 바노한합니다.
        if form.is_valid(): # 유효성 검사
            # form.cleaned_data에서 검증된 데이터를 꺼냅니다.
            # cleaned_data는 유효성 검사를 통과한 데이터가 담긴 딕셔너리.
            title = form.cleaned_data.get('title')        #reqeust.POST 까지가 dict 부분
            content = form.cleaned_data.get('content')  #cleaned 란뜻이 씻어서 데이터준다.
            Article.objects.create(title=title, content=content)
            return redirect('articles:index') #at name: 인덱스
    else:
        form = ArticleForm()
    context = {
        'form': form,
    }
    return render(request,'articles/new.html', context)
이렇게 사용하게되면 제목을 입력할때 아예 글자수를 제한하게 된다.
ERROR
위의 코드에서
form.is_vaild() 에 담기지 못하면
context 안 form 자체에 에러 메세지가 폼에 담기게 된다.
new.html
<form action="" method="POST">
    {% csrf_token %}
    {{ form.as_p }}
    {% comment %}
    {{ form.title }}
    {{ form.content }}
    {{ form.errors }}
    위에는 개별 field를 나눠서
    {{ form }}
    은 한번에
    {% endcomment %}
    <input type="submit">
</form>
그래서 에러메세지는 new.html 의 {{form.as_p}} 를 통해 보여주게 된다.
유효성검사는 매우 중요하다. 그렇지 않으면 데이터가 망가질수가 있다.
forms.py
뭔가 비슷함을 느껴야한다.
    title = forms.CharField(max_length=100)
    content = forms.CharField(widget=forms.Textarea)
class ArticleForm(forms.ModelForm):
    '''
    field : 실제 HTML input 태그의 데이터 타입을 지정
    widget : 실제 HTML input 태그의 모습

    ModelForm은 이미 정의한 Model을 이용하여
    Forms 시스템을 더욱 쉽게 사용하게 해주는 기능입니다.
    '''
    class Meta:
        model = Article
        fields = ('title', 'contnet')
이렇게 적으면
위에 아티클을 임포트시켜줘야한다.
from django import forms
from .models import Article <<<<<<<<<<<<< 여기

class ArticleForm(forms.Form):
    '''
    field : 실제 HTML input 태그의 데이터 타입을 지정
    widget : 실제 HTML input 태그의 모습

    ModelForm은 이미 정의한 Model을 이용하여
    Forms 시스템을 더욱 쉽게 사용하게 해주는 기능입니다.
    '''
    class Meta:
        model = Article
        fields = ('title', 'contnet')
토막 상식
forms.py 의 content = forms.CharField 와 models.py 의 content 는 다릅니다.
modles의 content는 테이블!
forms.py의 content는 데이터!
forms.py
#django form 시스템의 핵심은 재사용과 유효성 검사입니다.
# 1. 재사용 가능한 HTML Form 을 자동으로 만들어줍니다.
# 2. 폼에 담긴 데이터(사용자 입력값)를 알아서 검증해줍니다.

# django의 form은 크게 세 부분을 처리해줍니다.
# 1. fpsejflddmf dnlgks epdlxj wnsql
# 2. 데이터에 대한 HTML form 태그 생성
# 3. 클라이언트(사용자)로부터 받은 데이터 수신 및 처리

from django import forms
from .models import Article

class ArticleForm(forms.ModelForm):
    '''
    field : 실제 HTML input 태그의 데이터 타입을 지정
    widget : 실제 HTML input 태그의 모습

    ModelForm은 이미 정의한 Model을 이용하여
    Forms 시스템을 더욱 쉽게 사용하게 해주는 기능입니다.
    '''
    class Meta:
        model = Article # 어떤 모델인지 명시
        fields = '__all__' # 위에 작성한 모델(클래스)의 필드 중에서 보여줄것만 작성
맨 아래 all 로 썼다는 것이 바꼈다. 다만 풀어서쓰자.
에러가뜨거나, 다른사람을 고려할때 풀어쓰는 것이 좋다.
그리고 만약 시간도 받고싶다면 created_at 은 사용안된다.
models.py 에
#time = models.DateTimeField()
를 생성해주고 ()안의 내용을 아무 것도 없이 적어주자. 그다음
forms.py 의 fields 에 time을 입력해주면 시간이 기제된다. (시간을 직접 적을수 있는 공간입니다..)
교수님의 팁
M U V T 에서 V일떄 폼을 작성하면 될거같다.
파이썬 기초
튜플은 꼭 뒤에 콤마가와야한다.
ex) title 뒤에 콤마있어야함
  class Meta:
        model = Article # 어떤 모델인지 명시
        fields = ('title',) # 위에 작성한 모델(클래스)의 필드 중에서 보여줄것만 작성
이렇게 Form 을끝내고나면
views.py 에서
def new(request):
    if request.method =='POST':
        # 폼 인스턴스를 생성하고 요청에 의한 데이터로 채웁니다 (binding).
        form = ArticleForm(request.POST)
        # 폼에 바인딩된 데이터가 유효한지 검사합니다.
        # is_vaild() 메서드는 True/False를 바노한합니다.
        if form.is_valid(): # 유효성 검사
            # form.cleaned_data에서 검증된 데이터를 꺼냅니다.
            # cleaned_data는 유효성 검사를 통과한 데이터가 담긴 딕셔너리.
            title = form.cleaned_data.get('title')        #reqeust.POST 까지가 dict 부분
            content = form.cleaned_data.get('content')  #cleaned 란뜻이 씻어서 데이터준다.
            Article.objects.create(title=title, content=content)
            return redirect('articles:index') #at name: 인덱스
    else:
        form = ArticleForm()
    context = {
        'form': form,
    }
    return render(request,'articles/new.html', context)
를
def new(request):
    if request.method =='POST':
        # 폼 인스턴스를 생성하고 요청에 의한 데이터로 채웁니다 (binding).
        form = ArticleForm(request.POST)
        # 폼에 바인딩된 데이터가 유효한지 검사합니다.
        # is_vaild() 메서드는 True/False를 바노한합니다.
        if form.is_valid(): # 유효성 검사
            # form.cleaned_data에서 검증된 데이터를 꺼냅니다.
            # cleaned_data는 유효성 검사를 통과한 데이터가 담긴 딕셔너리.
            form.save()
            return redirect('articles:index') #at name: 인덱스
    else:
        form = ArticleForm()
    context = {
        'form': form,
    }
    return render(request,'articles/new.html', context)
form.save로 교체가 가능하다.
def update 바꾸기
views.py 에서
def update(request, article_pk):
    article = Article.objects.get(pk=article_pk)
    if request.method == 'POST':
        #새로 작성된 게시글 정보를 꺼냅니다.
        title = request.POST.get('title')
        content = request.POST.get('content')
        # 유효성 검사하기
        # if title.length <= 10:
        #     ... 하지만 장고 자체 기능을 사용해보자

        #기존 게시글의 내용에 덮어씌웁니다.
        article.title = title
        article.content = content
        article.save()
        return redirect('articles:index')
        pass
    else:
        # 기존의 내용을 가져와서 넘겨준다.
        context = {
            'article':article,
        }
        return render(request, 'articles/update.html', context)
에서
def update(request, article_pk):
    article = Article.objects.get(pk=article_pk)
    if request.method == 'POST':
        form = ArticleForm(request.POST)
        if form.is_valid():
            form.save()
            return redirect('articles:index')
    else:
        form = ArticleForm()
        # 기존의 내용을 가져와서 넘겨준다.
    context = {
        'form':form,
    }
    return render(request, 'articles/update.html', context)
로 바꿔준다.
그러면 NoResearch 가 뜨는데 이것은 urls 의 문제다 pk 인자를 못받고있는 듯하다.
urls 에서 update 를 찾아라.
다음 함수로 돌아가보자.
폼만들고
컨텍스트만들고
update.html을 보자
<form action="{% url 'articles:update' article.pk %}" method="POST">
    {% csrf_token %}
    <input type="text" name='title' value = "{{ article.title }}">
    <br>
    <input type="text" name='content' value = "{{ article.content }}">
    <br>
    <input type="submit">
</form>
아직 article 을쓰고있다. 우린 form을 쓰고있다.
article 을 추가시켜주면된다
def update(request, article_pk):
    article = Article.objects.get(pk=article_pk)
    if request.method == 'POST':
        form = ArticleForm(request.POST)
        if form.is_valid():
            form.save()
            return redirect('articles:index')
    else:
        form = ArticleForm()
        # 기존의 내용을 가져와서 넘겨준다.
    context = {
        'form':form,
        'article':article <<<<<<<<<<<<<<<<<<<<< 추가
    }
    return render(request, 'articles/update.html', context)
추가 방법
def update(request, article_pk):
    article = Article.objects.get(pk=article_pk)
    if request.method == 'POST':
        form = ArticleForm(request.POST)
        if form.is_valid():
            form.save()
            return redirect('articles:index')
    else:
        form = ArticleForm(instance=article)<<<<<<<<<<<<<바인딩하여 꺼내오는 것
        # 기존의 내용을 가져와서 넘겨준다.
    context = {
        'form':form,
        'article':article
    }
    return render(request, 'articles/update.html', context)
다음 update html 로가보자
<form action="{% url 'articles:update' article.pk %}" method="POST">
    {% csrf_token %}
    <input type="text" name='title' value = "{{ article.title }}">
    <br>
    <input type="text" name='content' value = "{{ article.content }}">
    <br>
    <input type="submit">
</form>
에서 지워버리자
<form action="{% url 'articles:update' article.pk %}" method="POST">
    {% csrf_token %}
    {{ form.as_p }}<<<<<<<<<<<<<<<<<이것만
    <input type="submit">
</form>
또한 article 를 적기싫다면?!
context = {
	'form':form,
	'article':article <<<<<<<<<<<<<<<<<<<<<이녀석

}
update.html 에서 맨위에 article.pk 대신 form.instace.pk 를 적어주면된다
<form action="{% url 'articles:update' form.instance.pk %}" method="POST">
    {% csrf_token %}						^^^^^^^^ 이 녀석
    {{ form.as_p }}
    <input type="submit">
</form>
여기까지만하면 수정된글이 저절로 저장됩니다.
위에 update 함수 수정해야합니다.
form = ArticleForm(request.POST) 에서"" , instance=article"를 추가해줍니다.
def update(request, article_pk):
    article = Article.objects.get(pk=article_pk)
    if request.method == 'POST':
        form = ArticleForm(request.POST, instance=article)
        if form.is_valid():
            form.save()
            return redirect('articles:index')
    else:
        form = ArticleForm(instance=article)
        # 기존의 내용을 가져와서 넘겨준다.
    context = {
        'form':form,
    }
    return render(request, 'articles/update.html', context)
이때 instance=article 은 방금 데이터를 수정하기위한 pk 데이터를 가지고 온것입니다.(데이터 값 불러오기)
이렇게 끝났다면 수정도 정상적으로 완료가 됩니다!
forms.py
꾸며주기? 미리 칸에 머 적어두기.
from django import forms
from .models import Article

class ArticleForm(forms.ModelForm):
    '''
    field : 실제 HTML input 태그의 데이터 타입을 지정
    widget : 실제 HTML input 태그의 모습

    ModelForm은 이미 정의한 Model을 이용하여
    Forms 시스템을 더욱 쉽게 사용하게 해주는 기능입니다.
    '''
    title = forms.CharField(<<<<<<<<<<<<<<<<<<<<<<<<<<<<<<<<<<<<<<<<<<<<<<<
        label='제목',
        widget=forms.TextInput(
            attrs={
                'class': 'my-title',
                'placeholder' : '제목을 입력해주세요~!'
            }
        )<<<<<<<<<<<<<<<<<<<<<<<
    )
<<<<<<<<<<<<<<<<<<<<<<<<<<<<<<<<<<<<<<<<<<<<<<<<<<<<<<<<<<<<<위에 사이
    class Meta:
        model = Article # 어떤 모델인지 명시
        fields = ('title','content',) # 위에 작성한 모델(클래스)의 필드 중에서 보여줄것만 작성
Detail
index.html 에서 만들기
<h1>게시글 목록</h1>

<a href="{% url 'articles:new' %}">글쓰기</a>

{% for article in article_list %}
    <h2>{{ article.title }}</h2>
    <p>{{ article.content }}</p>

    <a href="{% url 'articles:update' article.pk %}">수정하기</a>
    <a href="{% url 'articles:detail' article.pk %}">상세보기</a><<<<<<<<<<<<<<
{% endfor %}
urls.py
from django.urls import path
from . import views

app_name ='articles'
urlpatterns = [
    # READ
    path('',views.index, name='index'),
    path('<int:article_pk>/',views.detail, name='detail'),<<<<<<<<<<<<<<<<<<<<

    # CREATE
    path('new/', views.new, name='new'),

    # DELETE
    # UPDATE
    path('<int:article_pk>/update/', views.update, name='update'),
]
views.py
# Create your views here.
def index(request):
    # 1. DB에서 게시글 전부 가져옵니다.
    # Article = article.objects.all()[::-1] # 첫번째 방법
    # 두번쨰 방법( 성능이 좀더 빠르다. )
    article_list = Article.objects.order_by('-updated_at')

    # 2. context에 담아서 index.html로 넘겨 줍니다.
    context = {
        'article_list':article_list,
    }
    return render(request,'articles/index.html', context)
def new 를 수정해줍시다 ( 리다이렉트)
def new(request):
    if request.method =='POST':
        # 폼 인스턴스를 생성하고 요청에 의한 데이터로 채웁니다 (binding).
        form = ArticleForm(request.POST)
        # 폼에 바인딩된 데이터가 유효한지 검사합니다.
        # is_vaild() 메서드는 True/False를 바노한합니다.
        if form.is_valid(): # 유효성 검사
            # form.cleaned_data에서 검증된 데이터를 꺼냅니다.
            # cleaned_data는 유효성 검사를 통과한 데이터가 담긴 딕셔너리.
            article = form.save()
            return redirect('articles:index') #at name: 인덱스
    else:
        form = ArticleForm()
    context = {
        'form': form,
    }
    return render(request,'articles/new.html', context)
def new(request):
    if request.method =='POST':
        # 폼 인스턴스를 생성하고 요청에 의한 데이터로 채웁니다 (binding).
        form = ArticleForm(request.POST)
        # 폼에 바인딩된 데이터가 유효한지 검사합니다.
        # is_vaild() 메서드는 True/False를 바노한합니다.
        if form.is_valid(): # 유효성 검사
            # form.cleaned_data에서 검증된 데이터를 꺼냅니다.
            # cleaned_data는 유효성 검사를 통과한 데이터가 담긴 딕셔너리.
            article = form.save()
            return redirect('articles:detail', article.pk) #at name: 인덱스 <<<<<수정
    else:
        form = ArticleForm()
    context = {
        'form': form,
    }
    return render(request,'articles/new.html', context)
if 조건문의 리턴 을 리다이렉트로 바꿔줍니다.
에러 띄우기
400번대는 사용자 잘못
500번대는 개발자 잘못.
하지만 없는 게시판을 사용자가 검색하면?
http://127.0.0.1:8000/articles/50000/
404 에러를뜨게해주자
from django.shortcuts import render, redirect, <<<<<<<<<
from .models import Article
from .forms import ArticleForm

# Create your views here.
def index(request):
    # 1. DB에서 게시글 전부 가져옵니다.
    # Article = article.objects.all()[::-1] # 첫번째 방법
    # 두번쨰 방법( 성능이 좀더 빠르다. )
    article_list = Article.objects.order_by('-updated_at')

    # 2. context에 담아서 index.html로 넘겨 줍니다.
    context = {
        'article_list':article_list,
    }
    return render(request,'articles/index.html', context)


def detail(request, article_pk):
    #article = Article.objects.get(pk=article_pk)<<<<<<<<<<
    article = get_object_or_404(Article,pk=article_pk)<<<<<<<<<<
    context = {
        'article':article,
    }
    return render(request, 'articles/detail.html', context)

def new(request):
    if request.method =='POST':
        # 폼 인스턴스를 생성하고 요청에 의한 데이터로 채웁니다 (binding).
        form = ArticleForm(request.POST)
        # 폼에 바인딩된 데이터가 유효한지 검사합니다.
        # is_vaild() 메서드는 True/False를 바노한합니다.
        if form.is_valid(): # 유효성 검사
            # form.cleaned_data에서 검증된 데이터를 꺼냅니다.
            # cleaned_data는 유효성 검사를 통과한 데이터가 담긴 딕셔너리.
            article = form.save()
            return redirect('articles:detail', article.pk) #at name: 인덱스
    else:
        form = ArticleForm()
    context = {
        'form': form,
    }
    return render(request,'articles/new.html', context)
# 1. NOT NULL contsraints
# => 데이터베이스에 빈 값이 들어가려고한다.
# =>


def update(request, article_pk):
    article = Article.objects.get(pk=article_pk)
    if request.method == 'POST':
        form = ArticleForm(request.POST, instance=article)
        if form.is_valid():
            form.save()
            return redirect('articles:index')
    else:
        form = ArticleForm(instance=article)
        # 기존의 내용을 가져와서 넘겨준다.
    context = {
        'form':form,
    }
    return render(request, 'articles/update.html', context)
get_object_or_404 이녀석이다.
추가적으로 404페이지는 개발자가 꾸밀수있습니다 ㅋㅋ 커엽게
'SSAFY > Django' 카테고리의 다른 글
| Static 정적파일 & Media 파일 추가하기 (0) | 2021.03.18 |
|---|---|
| 현재까지 Django 요약 (0) | 2021.03.17 |
| Django 가상 환경 만들기 // 협업 (0) | 2021.03.13 |
| Django 관통 Prj (0) | 2021.03.13 |
| 게시판 만들기 ( 수정 삭제 기능 구현!) (0) | 2021.03.11 |